
There are so many marketers, advertisers and entrepreneurs who spend a mini-fortune on various keyword research tools. They painstakingly go through multiple tools to create the best possible keyword list for their SEO or PPC campaign.
However, for those of us with a limited budget or quite frankly no budget at all, Google has the best keyword planner within their Google Ads interface.
Honestly, for most small companies, they should not look further than the Google Ads Keyword Planner. It is all that you need to begin.
The only aspect to keep in mind is how to interpret the keyword data based on whether you want it for a SEO or a PPC campaign. This is important due to the way Google provides initial data. More on that will come up later in this article. Just wanted to give you a heads up so you are aware of this important point.
Why Should We Use Google Ads Keyword Planner?
There are several reasons why we should use Google Ads Keyword Planner instead of opting for expensive keyword research tools that charge on a monthly basis.
1) Well, the most obvious reason is that it is free. Anyone can use it, regardless of your budget. Just login to your Google Ads account and get started.
2) Of course I do understand being free is not everything. The quality of data matters. In this case, who can give better data regarding search volumes, keywords used, costs per click etc. on Google search as well as Google network than Google themselves.
Obviously Google will have unrestricted access to all of its own databases and analytics. The keyword data that you get using Google Ads Keyword Planner, is as accurate and authentic as it can get.
3) Another advantage of using the Google Ads Keyword Planner is you can add chosen keywords directly to your ad campaigns. This is beneficial for those running PPC campaigns as moment you have shortlisted a keyword or keyphrase, you can add it to your ad groups.
4) Keyword data can also be saved by users in various formats for further inspection.
5) Google’s keyword planner is quite intuitive and it gives you a huge number possible keywords as well as long phrases that you can possibly use with your campaign. With the variations provided, you get to see the competition levels and possible costs for each keyword.
6) You can search using a website address instead of a keyword. In this case, if you add a website URL, Google will go through it and provide the best keywords as per the page. By doing this, you could not only improve your own quality score, but also potentially use it for competitor analysis. All you have to do is add your competitor’s website URL and you can then find out what keywords they are possibly trying to work with.
Where is the Google Ads Keyword Planner Located?
How to find the keyword planner in Google Ads?
To locate the Google Ads Keyword Planner:
1) First, sign in to your Google Ads account via a desktop or laptop.
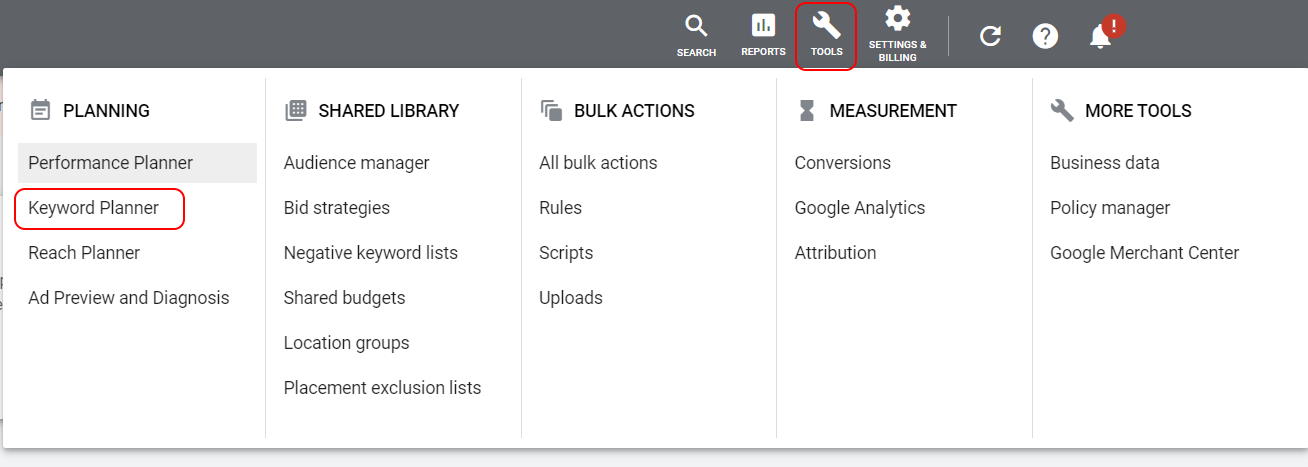
2) On the top menu bar, you will see “Tools.” Click on that.
3) From the drop down, choose “Keyword Planner” under the Planning tab.
How to Use the new Google Ads Keyword Planner for PPC Keyword Research?
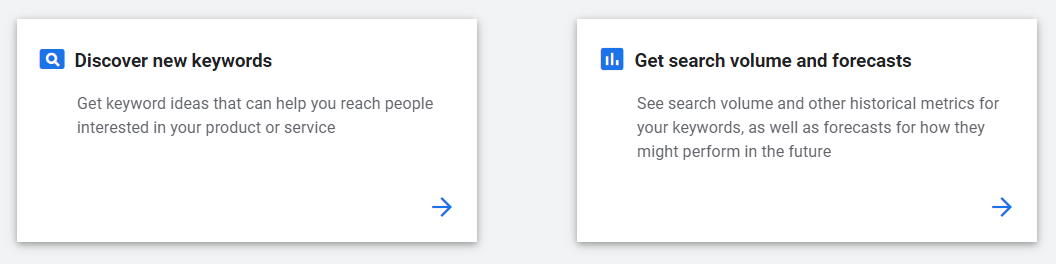
1) When you first launch the Google Ads Keyword Planner, you will be given a choice between “Discover New Keywords” and “Get Search Volume and Forecasts.”
Refer to the image below to see how the choice are provided.
For now, click on “Discover New Keywords.”
2) On the next screen, you will see “Start with Keywords” and “Start with a Website.”
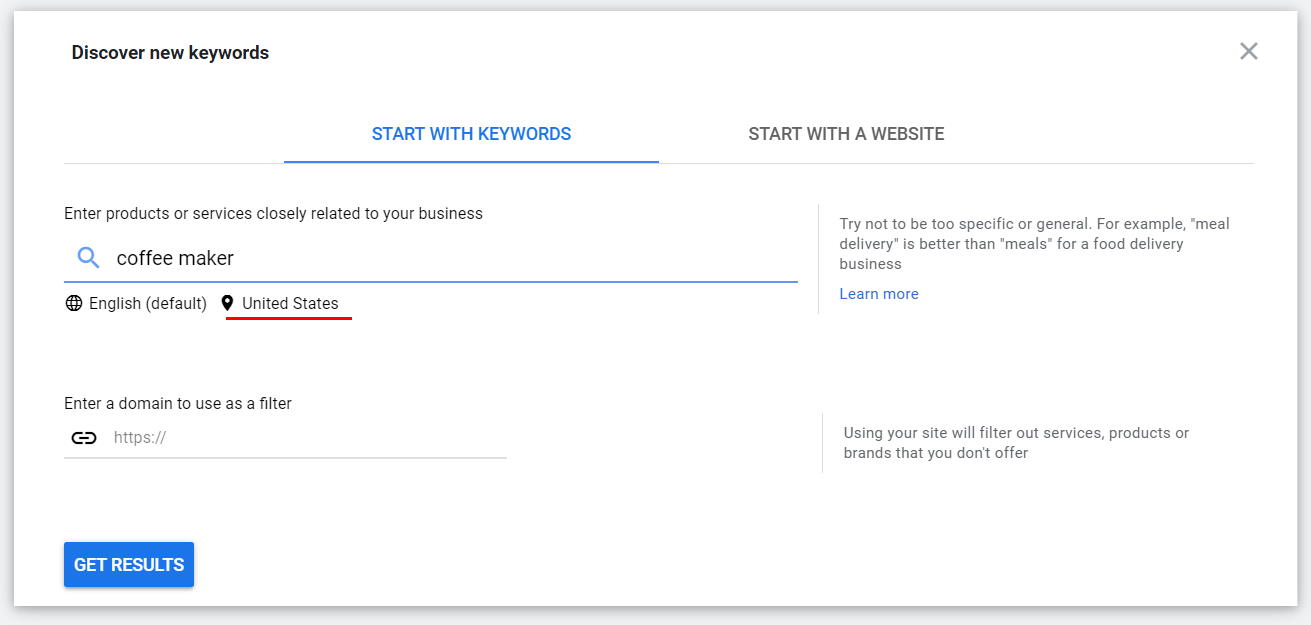
Ensure “Start With Keywords” is highlighted. At the search bar, you can enter your most important keyword related to your business.
For the sake of this tutorial, I have given the universal search term “coffee maker” as coffee seems to be something that is being used for all tutorials nowadays.
Also ensure your default location is highlighted. Just in case you need to change the country you are targeting, click on the country name below the search bar and choose whichever location you want to target.
Also of now, keep “Enter a domain to use as a filter” blank.
3) After clicking the “Get Results” button, you will see several keywords being shown related to your original keyword which in our case is “coffee maker”. Note that the keywords do not need to be put in quotes and you can enter more than one keyword by separating them with a comma (,).
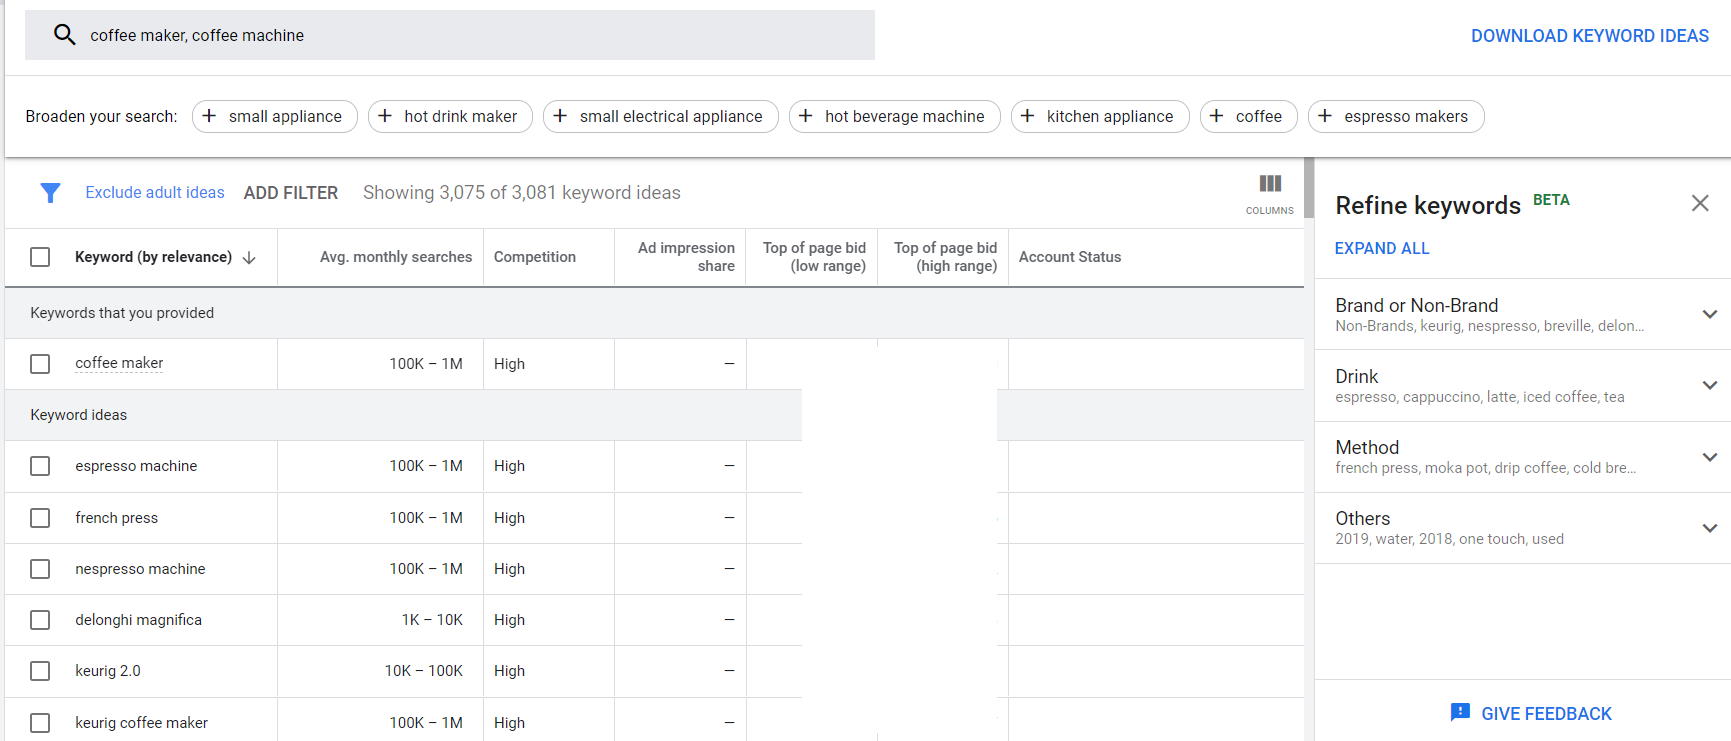
As you can see in the image above, for the term coffee maker, I got 3081 keyword ideas. Google will also show you the average monthly searches, competition level, potential cost etc. for each keyword.
On the right, you can refine your keywords displayed using various parameters. The great thing here is that the refining parameters change as per the keyword you have used for initial research.
If you have an active campaign, then you can simply choose a keyword and add it to your ad groups from the keyword planner itself.
However, resist the urge to add as many keywords as possible.
This is what I usually do:
1) First I group keywords as per their relevance to my product or service. Also if they are closely related to each other.
2) I also create a group of keywords that have low competition. Note that keywords with low competition may have low number of searches as well. Hence you need to make a judgement call and add keywords to your low competition group accordingly. Anything that shows up to 1000 searches is fine to add in your list. If something shows just 10 searches, then that keyword is unlikely to trigger your ad in the actual live campaign.
3) My next list, budget permitting, is to group all the keywords with highest searches per month regardless of competition level. This keyword group will obviously cost much higher than the others per click due to competition, but will also get more traffic due to the high activity on Google search.
4) Depending upon your experience with keywords, digital marketing and PPC ads, you may want to create more groups of keywords based on some common factor.
5) Once you have your keyword groups ready, you should ideally create separate Ad Groups for each. Even your sales page or landing page as well as ad content should be created as per the Ad Group and keywords chosen. This will ensure your ads are highly relevant as per the users needs and your quality score remains high for better cost per click rates.
Please do not club all keywords into one group, create one sales page and a few ad texts and expect good results.
Google Ads have become quite intuitive in the past few years and it shows ads to users after figuring out their “intent.” Ads are also triggered in a way that the final sales page is highly relevant to the user’s needs. This ensures Google search users have a good experience and even the advertisers have a better return on investment.
So do take the time to create keyword groups, create sales page content as well as ad content based on those keywords only.
Also no need to add hundreds or thousands of keywords.
Choose only the best ones for each group. As it is Google Ads are now defaulted to broad match and your ad will be triggered for variations of the keywords as well.
Why Google Ads Keyword Planner is not as useful for SEO keyword research?
The average number of monthly searches being shown by Google Ads Keyword Planner by default is set to broad matches. This means that if it is showing 5000 searches per month, it means there are 5000 searches related to that keyword including variations of it. Not that the exact keyword is getting that many searches per month.
Regardless of what you read on the internet and on various tutorials, there is no foolproof or guaranteed way to change this to exact match and get accurate results.
While broad match numbers will not affect your PPC campaign, you could end up getting mislead for SEO. Imagine spending well over a year and a substantial amount of money to realize the keyword you were optimizing for did not actually get that many searches per month.
Hence when it comes to SEO, its best to check for keyword suggestions on the Keyword Planner but also then use other tools and means to finalize if those keywords are worth the trouble.
Using Google Ads Keyword Planner for Competitor Analysis
Remember above after clicking “Discover New Keywords”, you had a choice between “Start with Keywords” or “Start With a Website”?
You can choose “Start with a Website” and use it in two ways.
1) You can add your sales or landing page URL here and see if Google provides the same keywords as what you have added in that particular ad group. If there are similar keywords, the chances of your quality score being high are good.
If you do not get similar keywords, you may want to change your sales page content to reflect some of the keywords.
2) You could add your competitor’s URLs, landing pages, sales pages here as well.
So based on your competitor’s URLs, the keyword suggestions that are given by Google are probably some of the keywords being used by your competitors.
You can then add these keywords in the “Start with Keywords” tab and check competition level, potential costs and outbid your competitors.
Note this is not an exact science when it comes to PPC competitor analysis but it still gives a decent idea of what your competitor’s may be up to.
Final Thoughts
For reasons mentioned already, the new Google Ads Keyword Planner is a brilliant tool for PPC keyword research. The most obvious reason to use it is that Google will have the best, unrestricted and accurate access to their own search results, logs and historical data. Also the keyword planner is completely free. There is no reason why you should not be using it.
Therefore in conclusion, the new Google Ads Keyword Planner is highly recommended for all marketers and must be part of your overall keyword research plan.


